Showing posts with label homemade. Show all posts

2.22.2017

remembering our Tennessee house

I'm so behind in blogging right now because things have been crazy since Christmas! Most everyone who reads this blog (hi family!) knows that we moved to Indiana at the end of January. Deric had a final interview with the new church while we were visiting his parents for Christmas so we came home from Christmas, took down our Christmas decorations and immediately launched into packing. January went by so quickly between packing, finalizing details with the new church and a moving date, and squeezing in time with all of our friends before we left. Its still surreal to me-- sometimes it'll randomly hit me that we're not just on an extended trip up north. We'd lived in Tennessee for almost six years and it was so sad to leave our church family and friends, but there are so many benefits to moving north that we could look forward to. We now live a town over from Deric's parents and have already enjoyed multiple nights of babysitting, plus we've been able to see Courtney and her kids a few times. Our drive to Port Hope has been cut in half (thank you Jesus!) and even the weather has been good to us--its been in the 60s for the last week!

Before we started packing the house, I took photos of every room so that we could always remember our first home. We've celebrated all of our anniversaries here, fixed up and painted every room (the kitchen twice!), brought home both boys to this house, and watched Jake start to crawl and take his first steps--amidst so many other good memories. We'll miss this little house.


Our living room was off the front door and immediately to the right. Its seen so many different arrangements, especially as we worked to find a way to give the boys room to play with their toys without taking over the living room.


Straight ahead from the front door was our dining room. Those shelves on the wall were one of Deric's very first carpentry projects! A year or two later we got that dresser off Craigslist and painted it to turn it into a buffet.


The kitchen was actually remodeled in November and I got to enjoy a brand-new kitchen for two short months before we moved. The view from the window looked out to the church and the playground so I'd always be able to see Deric coming home from work while making dinner, and usually shortly after watch Deric and Jake playing on the driveway.


A few years ago Deric built this island to put along the back wall of the kitchen. We've had quite a few people comment on it and I was always proud to tell them that Deric had made it himself. He's pretty handy to have around. ;) The door to the right is the pantry, and next to it is the door to the mudroom and garage.


Our spare bedroom never got much attention. It was a craft and guest room before we had the boys and then became a playroom and guest room. Our bigger toys--the train table and play kitchen--took up so much space that they couldn't stay in the living room. I painted the walls a light aqua a year or two back with a "big kid" room in mind but we never got to that point. 

My favorite room in our house was always the boys' room. When I was pregnant with Jake we painted the green walls this perfect shade of gray, hung dark navy curtains for naps, and painted that dresser (Craiglist again!). When it was just Jake in this room, the crib was where the toddler bed is now, and the dresser was where the crib is. Deric put up a shelf above the crib and we hung artwork that has meaning to us. The big print is from Thailand; to the left of the dresser, the navy print is a great motto of sorts for the boys: "Be brave, strong and courageous. Seek adventure and truth." We also hung a map of Thailand and their baby handprints. (Deric later built Jake's toddler bed!)


I love the first twelve month photos of Jake and plan to do the same thing with Reid's photos here in just three months (sob!). Another piece of artwork with the rhyme "Whales and snails and puppy dog tails, drapes as capes and little toys snakes". We made the Jakes Creek Trail sign after hiking along the so-named trail in the mountains. Below the sign I planned to hang his initials but once Reid came along, the room already revolved around Jake so I never did. ;)


The master bedroom! Not much to see in here as we really didn't spend any time in here except for sleeping. Suffice it to say I'm really looking forward to an actual master bedroom and a master bathroom as well. ;) I do remember painting the trim in this room the same weekend that we moved in. The previous renters had started to paint all the trim in the house but hadn't finished and this room was halfway done. The walls were dark brown so this room was one of the first to be painted. We built our headboard with my parents' help a few months after moving in.


And I couldn't forget the best part of our house, our neighbors! Bob and Jackie lived next door to us for four years and babysat frequently. Jake would wander over to their house to say hi, he would help Bob pick up sticks in his yard, and he loved to jump from stone to stone along their path. Bob and Jackie were so good to our family, and we miss them already.


4.25.2012

A Long Time Comin'

I've been meaning to show y'all my "latest" (I'm using that term loosely) painting project for a while...actually, for about four months. I finished in early January.  Why thank you, I am good at procrastinating! It's an art, really.

I saw a painting done by Ashley at The Handmade Home and decided to recreate her sign:

She painted hers for a baby girl's nursery, but with some different colors it could really go anywhere. I used leftover wall paint (the tan from our dining room/foyer and the brown from our kitchen) for the chevron which made it very easy to wipe it away to get that aged look. The acrylic craft paint I used to write our name was somewhat harder to rub off-- I actually had to scrape it off since it dried so quickly.
 
(I apologize for the quality, but my phone actually captures the true color better than my camera. The front door is to the right, which explains the inconsistent lighting.)


The painting hangs in our foyer, directly across from the hallway to our bedrooms, so we see it every time we walk down the hall. I contemplated for a while over what to hang in that space because I didn't want to hang something I'd quickly get tired of seeing multiple times a day. So far I'm not sick of seeing it (and Deric hasn't said anything either) but you never know. If need be, I'll just have to switch things around. It's not like I have 144 ideas waiting for me on Pinterest or anything, and at my current pace of approximately four months per painting, I should finish somewhere around never. ;)


2.02.2012

Sewing My ABCs

I thought I'd show you how I sewed the alphabet for Oliver's first birthday.

You've probably seen a fabric alphabet before. (If you're on Pinterest, I know you've seen this before.)

Nevertheless, here's the behind-the-scenes for the alphabet according to Ashley (and Chez Beeper Bebe, whose tutorial I used).

1. Find a basic font and print it out. Or do what I did: lay your paper over your computer screen, and verryyy lightly, trace the letters. (My printer's low on ink.)


2. Cut the letters out. (I know, rocket science.) Flip the letters over and trace onto fabric. This makes it so you sew the backside of the letter rather than the front.


3. For each letter, make a sandwich. Two pieces of fabric with enough batting in the middle to make them squishy. Make sure you've got at least half an inch extra fabric and batting around the letter to make sewing much easier. You won't have to worry about running off the edge of the fabric.


I lucked out at the store and found this Christmas "snow" for .94 cents so I didn't have to buy expensive batting. Shook off the glitter and I was good to go.


4. Disregard step two and trace the front of the letter (it really doesn't matter-- I covered the pen with my stitches). Pin the fabric + batting together. You'll notice I don't have much extra fabric around the letter. I had to redo this letter because while sewing I accidentally ran off the edge of the fabric, resulting in the batting sticking through the stitches.


 5. Experiment with stitches. I practiced with the letter L since its a simple letter. I tried a straight stitch and zigzag. Straight stitches were easier, but zigzag looked better. Plus, I think zigzag will be more durable over time. Maybe, maybe not. I used a bunch of fabric from my scrap bin, so I had to learn which fabrics frayed and which ones didn't. Unless you're a master seamstress and therefore aren't reading my tutorial because you know what you're doing, I recommend sewing a few experimental letters.


6. Once you've decided on fabrics and stitches, get going. Twenty-six letters takes a while. Turn on music (or watch Burn Notice on Netflix) and sew away. I did the straight letters first until I got comfortable enough to sew curves.

7. Once you've sewed your letters, cut each letter out. I cut about an eighth of an inch from my seam. I tried to sew the letters so that the batting didn't show, but I couldn't make it work. I just did my best to cut nice clean lines so the letters didn't look sloppy. If you look closely, you can see the batting peeking out. No big deal. Add Fray Check around the edges if you like.


8. Stretch out the kink in your neck and back, and you're finished! If I'd had time, I would have sewn a simple drawstring bag to keep the letters in. But considering I cut out the last few letters on the way to the party, a bag didn't happen. Marissa, I'll let you take care of that. ;)


Like I said before, my tutorial obviously isn't comprehensive. If you're looking for a more detailed tutorial, check out Holly's tutorial-- she made her letters magnets. Or Stitching in the Dark's--she sewed a basket to store her letters.

This is a great project for practicing your sewing skills. Seeing as I still have trouble sewing straight lines, I should probably work on a few more alphabets!

P.S. Mom, I think you should know I used part of my Rugrats pillowcase for the S and the V. It was a tough sacrifice to make, but I did it! ;)
Photobucket

10.31.2011

Cheap Halloween Decorations

I forgot to take pictures of the decorations we had for our Halloween party yesterday, so they get their own post. I didn't plan for hardly any decorations for the party because we were on a budget, and as much as I like decorating, I knew decorations aren't as necessary as food and such. Food is definitely a priority.

Enter Jessica at How About Orange. She always has fantastic ideas that make me wish I'd thought of them myself (but at least I can steal her ideas). Like her trashbag spiderwebs. So simple and incredibly cheap. Cute, too.


Here's my version:


One trashbag makes two spiderwebs. We made eight webs and put them up around the youth room. They were perfect decorations because they were big enough to make a statement without needing to make millions of webs.

I'd hang them up on our front porch for trick-or-treaters, but unfortunately I'm pretty sure we won't be getting any trick-or-treaters tonight. A long driveway + a street with no sidewalks= no cute kids in costumes.

Happy Halloween! Hope ya'll are visited by cute trick-or-treaters!

10.18.2011

Jumpin' on the Bandwagon

I've seen upholstered nailhead headboards all over the Internet for a while now. They sell for an average of $500 at places like West Elm, so naturally there are hundreds (literally) of DIYed versions for under $100. I'd never upholstered a headboard but I'd seen so many tutorials that I knew it wouldn't be hard to do. Plus, doing it ourselves was the only option because Lord knows we'd never spend $500 on, well, anything.

This is West Elm's version...


which is really just this:
Seriously, $500?!

The headboard made by Centsational Girl is probably the most popular DIY version. Its gorgeous, but no way would I ever attempt that curvy shape she did. She must have a lot of patience.


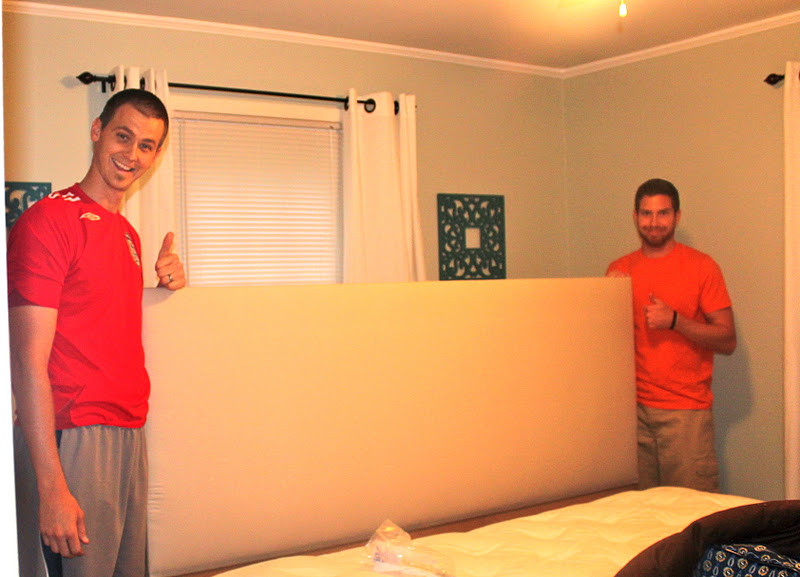
Despite the simplicity of upholstering a rectangular headboard, Deric and I decided to wait to build it until my family came to town on Labor Day. Dad's a handy man and we knew he could help in case we ran into problems. Our only concern with the headboard was how we'd support it. We couldn't hang it on the wall like most of the tutorials did because there's a window directly behind our bed. We didn't want to support it on two legs, like the West Elm version, because we were afraid it wouldn't be enough support. Also, our bed frame has wheels and moves pretty easily so we didn't know if that would be a problem. 

We bought particle board and had it cut down to the width of our bed. To add some height (so that we could sit up against it), we added a 1x6 to the top to make it about four feet tall. Per Dad's advice, we didn't alter the particle board at all--its one big square with the bottom corners bolted to the bed frame. We laid quilting batting over the top half and stapled it on the backside. Then we covered it with linen, which I first had to iron. 


After it was as smooth as linen gets, Deric and I stapled it inch by inch to the back of the board.


Deric, Chad and Dad bolted it to the bed frame while I took pictures (without white-balancing--sorry about the fake tans, boys). And aside from the nailhead trim which hadn't come in the mail yet, we were done! And in one afternoon...although we did have a lot of help.


The nailhead trim came in a few days later, but it took us about a month to get around to finally adding it. And no, we definitely did not nail in each nailhead individually. They sell kits online where you only nail in every five nails and it goes so much faster. Deric and I got it all done within an hour.


I made myself get over the fact that even with the trim kit, the nailheads would never be ramrod straight. But I got over that only to get fixated on the barely-an-inch overlap of the frames and the headboard. That's an easy fix; I just have to get around to actually doing it...so probably in about a month or so.


And last but not least, check out Deric's creative (and very classy) support system. To provide more support for the top of the headboard but allow room for the curtains to move, he nailed the remnants of the 1x6 perpendicular to the headboard. He then covered the boards with his socks so they wouldn't scratch the walls. Creative, huh? And classy too. It really is smart...I couldn't come up with a way to support it without smashing the curtains, so I'm glad he could.


There you have it! Total cost was right under $100 for the board, batting, fabric, nailhead trim and the hardware. Big thanks to the fam for helping us build it. I'll be brainstorming our next project for Thanksgiving! 

Just kidding.

8.16.2011

Eat

I first saw the zinc letters in this kitchen (which is absolutely gorgeous, by the way. See the whole kitchen here.)

Later, I saw a tutorial for zinc-inspired letters and it turns out its incredibly easy to make these fake zinc letters. Silver paint over black paint on cardboard letters. Easy, right?


So I went to Hobby Lobby to get letters and paint, and an hour later....voila!


My letters turned out a little dark because I used "Gunmetal Gray" paint, but I still like them a lot. And for under $5, even better!

8.11.2011

Homemade Laundry Detergent

There are tons and tons of recipes for homemade laundry detergent out there. I never thought about making your own detergent until I saw it on Pinterest. When I looked it up, there were too many recipes to choose from. I have no experience with making detergent or with any of the ingredients (like Borax, etc.), but most of the recipes looked fairly simple so I wanted to try it. 

The recipe I decided to try was from Erin @ Why Not Sew. Her recipe leaves you with two gallons of detergent so I only made half because of storage. One gallon is enough at a time. All I needed to make the detergent was water, a Fels-Naptha bar, washing soda, and Borax. Since her tutorial can explain everything, I won't go into detail. 


Everything went really smoothly, except when I left the soap to boil for a minute and went to change the laundry. I came back to see it boiling over, which left me scrubbing the insides/underneaths of the stove for a few days. But at least it was soap that spilled, so now the stove is nice and clean. :)

I used the detergent today (about 1/2 cup per load) and it worked perfectly. This detergent doesn't make suds, which I have to get used to, but it worked just fine. There may not be a big advantage in using homemade detergent over store-bought, but I was motivated to try it because:
a) its simple and easy
b) its much cheaper than store-bought
c) I know what goes into it...no nasty chemicals I can't pronounce
d) less waste since I don't have to buy a plastic container

So there you have it. It works for me and I'll continue to make it. I feel proud of myself for making my own detergent because until recently, I hadn't even thought about making it on my own. Ya know how sometimes you forget that you don't have to buy everything??