
This is West Elm's version...

which is really just this:

Seriously, $500?!
The headboard made by Centsational Girl is probably the most popular DIY version. Its gorgeous, but no way would I ever attempt that curvy shape she did. She must have a lot of patience.

Despite the simplicity of upholstering a rectangular headboard, Deric and I decided to wait to build it until my family came to town on Labor Day. Dad's a handy man and we knew he could help in case we ran into problems. Our only concern with the headboard was how we'd support it. We couldn't hang it on the wall like most of the tutorials did because there's a window directly behind our bed. We didn't want to support it on two legs, like the West Elm version, because we were afraid it wouldn't be enough support. Also, our bed frame has wheels and moves pretty easily so we didn't know if that would be a problem.
We bought particle board and had it cut down to the width of our bed. To add some height (so that we could sit up against it), we added a 1x6 to the top to make it about four feet tall. Per Dad's advice, we didn't alter the particle board at all--its one big square with the bottom corners bolted to the bed frame. We laid quilting batting over the top half and stapled it on the backside. Then we covered it with linen, which I first had to iron.

After it was as smooth as linen gets, Deric and I stapled it inch by inch to the back of the board.


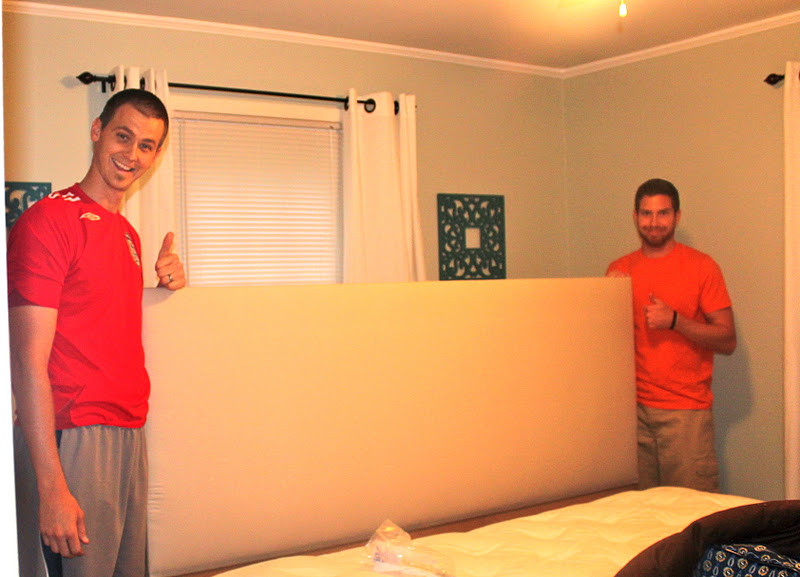
Deric, Chad and Dad bolted it to the bed frame while I took pictures (without white-balancing--sorry about the fake tans, boys). And aside from the nailhead trim which hadn't come in the mail yet, we were done! And in one afternoon...although we did have a lot of help.
The nailhead trim came in a few days later, but it took us about a month to get around to finally adding it. And no, we definitely did not nail in each nailhead individually. They sell kits online where you only nail in every five nails and it goes so much faster. Deric and I got it all done within an hour.

I made myself get over the fact that even with the trim kit, the nailheads would never be ramrod straight. But I got over that only to get fixated on the barely-an-inch overlap of the frames and the headboard. That's an easy fix; I just have to get around to actually doing it...so probably in about a month or so.

And last but not least, check out Deric's creative (and very classy) support system. To provide more support for the top of the headboard but allow room for the curtains to move, he nailed the remnants of the 1x6 perpendicular to the headboard. He then covered the boards with his socks so they wouldn't scratch the walls. Creative, huh? And classy too. It really is smart...I couldn't come up with a way to support it without smashing the curtains, so I'm glad he could.

There you have it! Total cost was right under $100 for the board, batting, fabric, nailhead trim and the hardware. Big thanks to the fam for helping us build it. I'll be brainstorming our next project for Thanksgiving!
Just kidding.
Ashley that looks fabulous! I would love to make one and we'll see if I ever actually do it. Good job!
ReplyDeleteThanks, Riss! By the way, you need to blog about your pallet shelves. I loved them and I want to see what you did with them!
ReplyDelete